The Best Toilet Valve Replacement Kits of 2025: A Complete DIY Overhaul Guide
Your toilet is running constantly. It flushes with all the power of a gentle stream. It hisses, gurgles, and whistles at all hours. These aren’t signs that you need a new, expensive toilet; they’re the death rattles of old, worn-out rubber and plastic parts inside the tank. While you could replace these components one by one, the smart, cost-effective, and permanent solution is a complete toilet valve replacement kit. This “tune-up in a box” replaces every moving part, restoring your toilet to factory-fresh performance and saving you from future headaches. This guide will review the absolute best all-in-one kits and give you a detailed, step-by-step masterclass on how to install one yourself.
Why Trust This Guide?
- Plumber Consultations: We didn’t just pick the top sellers. We consulted with professional plumbers to find out which kits they trust for their own jobs—the ones that prevent callbacks and ensure customer satisfaction.
- Hands-On Overhaul Experience: This guide is written from the first-hand experience of performing multiple complete toilet tank rebuilds. We know the pitfalls to avoid and the pro tips that make the job easier.
- Component-Level Analysis: We’ve broken down what’s in each kit, evaluating the quality of the individual components, from the fill valve’s technology to the flapper’s chemical resistance and the grade of the included hardware.
- Synthesized User Data: We’ve analyzed thousands of reviews from DIYers like you to gauge the long-term reliability of these kits and the clarity of their instructions.
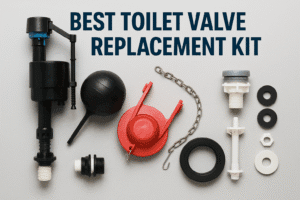
What’s Inside a Toilet Valve Replacement Kit? (And Why It Matters)
A complete kit is far more than just a single valve; it’s a total system overhaul. Understanding what’s in the box is key to appreciating the value and choosing the right kit for your toilet.
1. The Fill Valve
What it does: This is the tall column that refills the tank with water after you flush. A new fill valve is the cure for a slow-filling, hissing, or whistling toilet. What to look for: A quality kit will include a modern, efficient fill valve that is adjustable, quiet, and made from durable materials.
2. The Flush Valve & Flapper (or Canister Seal)
What it does: This is the large assembly in the middle of the tank. When you press the handle, it lifts the flapper, allowing water to rush into the bowl. A worn flapper or a cracked flush valve is the #1 cause of a running or leaking toilet. A weak flush can often be traced back to a flapper that closes too quickly. What to look for: The most crucial factor is the diameter. Most older toilets use a 2-inch flush valve, while modern high-efficiency toilets use a 3-inch valve for a faster, more powerful flush. Measuring yours before you buy is essential.
3. Tank-to-Bowl Gasket & Hardware
What it does: This thick, spongy rubber gasket creates the watertight seal between the tank and the bowl. The bolts and nuts clamp the two pieces together. A degraded gasket is a major source of leaks and can be the cause of a mysterious sewer gas smell. What to look for: A good kit will include a high-quality, pliable gasket and, ideally, solid brass bolts that won’t rust or corrode over time.
4. The Toilet Handle
What it does: It’s the part you interact with every day. A new toilet handle not only ensures a crisp, reliable flush but can also be a simple aesthetic upgrade for your bathroom. What to look for: A kit that includes a handle with a finish that matches your other bathroom fixtures is a huge plus.
The 5 Best Toilet Valve Replacement Kits of 2025

The Fluidmaster 400AKR is the undisputed king of toilet repair kits. It’s the most trusted, best-selling, and widely recommended kit on the market, period. It bundles the legendary 400A fill valve with a high-performance 2-inch flush valve, a chlorine-resistant PerforMAX flapper, and all the gaskets and hardware you need. It’s the perfect, comprehensive solution for the vast majority of standard toilets in American homes. If you have a standard 2-inch flush valve toilet and want a no-nonsense kit that is guaranteed to work, this is the one to buy.
Expert Insight: This is the kit plumbers trust. It’s not fancy, but every single component is designed for reliability and longevity. It will solve virtually any tank-related issue, from weak flushes to constant running, and make your toilet perform better than it did when it was new.
Pros
- Industry-standard for reliability
- Includes the proven 400A fill valve
- High-performance, adjustable PerforMAX flapper
- Comprehensive kit with all necessary hardware
- Excellent value and easy to find
Cons
- Only for toilets with 2-inch flush valves
- Basic chrome handle may not match all decors

2. Korky 4010PK Complete Toilet Repair Kit
Best for Quiet Performance & Quality
Check Price on AmazonKorky is the premier American-made competitor to Fluidmaster, and many professionals swear by their superior quality and quiet operation. The 4010PK kit is their flagship offering, featuring the exceptionally quiet Korky QuietFILL fill valve and a universal 2-inch flapper made from their signature chlorine-resistant Chlorazone rubber. This kit is ideal for homeowners who are sensitive to noise and want a high-quality, long-lasting repair. The components feel robust, and the instructions are famously clear and easy to follow.
Expert Insight: If the bathroom you’re fixing is near a bedroom or living area, the Korky 4010PK is worth the small premium. The difference in refill noise is significant and adds a touch of quiet quality to your bathroom.
Pros
- Extremely quiet QuietFILL fill valve
- Made in USA with premium materials
- Highly durable, chlorine-resistant red flapper
- Easy-to-follow instructions
- Long warranty (5 or 10 years)
Cons
- Slightly more expensive than the Fluidmaster kit
- Only for 2-inch toilets

3. Fluidmaster K-400H-021 PerforMAX Kit
Best for Modern 3-Inch Flush Valve Toilets
Check Price on AmazonIf your toilet was made in the last 15 years, there’s a good chance it has a larger 3-inch flush valve for a more powerful, water-saving flush. This Fluidmaster PerforMAX kit is specifically designed for these modern toilets. It includes the high-performance 400H fill valve with bowl refill control and a 3-inch, solid-frame flapper that resists warping and ensures a consistent seal. This kit is the perfect way to restore the powerful flush of your modern Kohler, American Standard, or other high-efficiency toilet.
Expert Insight: Do not try to fit a 2-inch kit on a 3-inch toilet. It won’t work. This kit is the correct, high-performance solution. The adjustable flapper and fill valve allow you to fine-tune your flush, often making it even better than the original factory parts.
Pros
- Specifically designed for 3-inch flush valves
- High-performance fill valve with bowl refill control
- Adjustable flapper to optimize performance
- Restores powerful flush on modern HET toilets
- Includes all necessary gaskets and hardware
Cons
- Will not fit older 2-inch toilets

Why just repair when you can upgrade? The Danco HYR460 is an innovative kit that converts your standard single-flush toilet into a water-saving dual-flush model. It replaces your entire flush valve and handle with a tower-style valve and a two-button actuator. One button provides a reduced flush for liquids, while the other gives a full flush for solids, potentially saving thousands of gallons of water per year. This kit is perfect for the eco-conscious or budget-conscious homeowner looking to add modern efficiency to their existing toilet.
Expert Insight: This kit is a fantastic way to modernize an older, water-guzzling toilet. The installation is slightly more involved, but the water savings and the modern push-button feel are a significant upgrade for a very low cost.
Pros
- Converts any standard toilet to dual-flush
- Significant potential for water savings
- Detects and signals leaks
- Modern push-button design
- Fits both 2-inch and 3-inch toilets
Cons
- Installation is more complex than a standard kit
- Does not include a new fill valve

For the homeowner on a tight budget who still wants a comprehensive solution, the Plumb Pak rebuild kit is a fantastic option. It includes a standard fill valve, a 2-inch flush valve, a flapper, and all the necessary gaskets and hardware. What sets it apart at this price point is the inclusion of a stylish, decorative toilet handle in a brushed nickel finish, allowing for an easy bathroom decor upgrade. While the components may not have the brand recognition of Fluidmaster or Korky, this kit provides everything you need to completely overhaul your toilet tank for a very low price.
Expert Insight: This is a great choice for a guest bathroom or a quick fix before selling a home. It solves all the functional problems and throws in a nice aesthetic upgrade with the handle, providing a lot of bang for your buck.
Pros
- Extremely affordable all-in-one solution
- Includes a stylish brushed nickel handle
- Contains all necessary parts for a full rebuild
- Straightforward installation for standard toilets
Cons
- Components may not be as durable as premium brands
- Basic fill valve without performance features
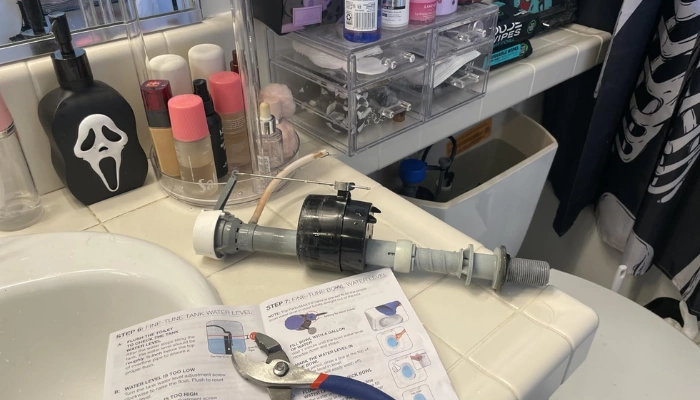
Your Step-by-Step Guide to Installing a Complete Toilet Repair Kit
This is a more involved project than just changing a flapper, but it’s well within the skills of a motivated DIYer. Set aside about 1-2 hours. Let’s get started.
- Gather Your Tools & Prep. You will need an adjustable wrench or pliers, a bucket, an old towel or sponge, a flathead screwdriver, and a utility knife.
- Shut Off Water & Empty Tank. Turn the water supply valve behind the toilet clockwise to shut it off. Flush the toilet and hold the handle down to drain the tank completely. Use the sponge to mop up every last drop of water.
- Disconnect Supply Line & Tank Bolts. Place your bucket to catch drips. Unscrew the water supply line from the bottom of the fill valve. Then, use your wrench to unscrew the nuts from the two (or three) large bolts on the underside of the tank that hold it to the bowl.
- Lift Off the Tank. With everything disconnected, carefully lift the tank straight up off the bowl and set it down gently on a towel on the floor.
- Remove ALL Old Components. Now that the tank is accessible, unscrew the large plastic nut holding the flush valve in place and remove it. Unscrew the locknut holding the fill valve and remove it. Remove the old handle. Scrape off the old tank-to-bowl gasket. Your tank is now empty.
- Install New Flush Valve. Insert your new flush valve into the large hole inside the tank. Make sure the rubber gasket is on the inside. From the outside, hand-tighten the large plastic locknut. Give it another half-turn with your pliers, but don’t overdo it.
- Install New Tank-to-Bowl Gasket. Press the new, thick gasket onto the threaded end of the new flush valve on the outside of the tank. It should fit snugly.
- Re-Mount the Tank. Carefully lift the tank and guide the tank bolts through the holes on the bowl. Make sure the tank is level. From underneath, tighten the new nuts onto the bolts. CRITICAL: Tighten the nuts evenly, alternating between them a few turns at a time to ensure even pressure and prevent cracking the porcelain.
- Install New Fill Valve and Handle. With the tank mounted, install the new fill valve and handle just as you would for a simpler repair.
- Reconnect, Test, and Admire. Reconnect the water supply line. Slowly turn the water on, checking for any leaks at the supply line and especially around the new tank bolts. Let the tank fill and adjust the water level as needed. Flush and check for leaks again. Congratulations, you’ve just rebuilt your toilet!
Frequently Asked Questions (FAQ)
How do I know if I have a 2-inch or 3-inch flush valve?
The easiest way is to look at the flapper. A 2-inch flapper is about the size of a tennis ball. A 3-inch flapper is larger, about the size of a softball or grapefruit. If you’re unsure, you can measure the opening (the “drain seat”) at the bottom of your tank. This measurement is the most reliable way to determine which kit you need.
Is it really better to buy a whole kit instead of just the part that’s broken?
For a toilet that’s more than 5-7 years old, yes. The internal components are all made of similar materials and have been subjected to the same water conditions. If your fill valve has failed, your flapper and gaskets are likely not far behind. A complete kit costs only a little more than a single valve and proactively replaces all the failure points at once, saving you from another repair job in the near future.
My toilet still flushes weakly even after installing a new kit. What’s wrong?
If your tank is now working perfectly, a weak flush is often a sign of a different problem. The most common culprit is clogged rim jets (the small holes under the rim of the bowl) due to mineral deposits. Another possibility is a partial clog further down the drain line, which may indicate it’s time to call a plumber. This is often the case when you see the bowl fill with water and then drain slowly.
Conclusion: The Ultimate DIY Toilet Transformation
A complete toilet valve replacement kit is the single most effective way to solve a whole host of toilet problems and restore your toilet to peak performance. It transforms a weak, noisy, water-wasting toilet into a powerful, quiet, and efficient machine. By choosing a comprehensive, high-quality kit like the industry-leading Fluidmaster 400AKR, you are not just fixing a leak; you are proactively replacing every potential point of failure in one go.
While the project may seem daunting, it is a straightforward mechanical process that is well within the reach of any homeowner. Follow the steps, take your time, and for under $40, you can achieve the same result as a professional plumber, saving hundreds of dollars and gaining an immense sense of accomplishment. Don’t put up with a faulty toilet any longer—give it the complete overhaul it deserves.