Which Way to Turn Toilet Water Off: A Plumber’s Complete 2025 Guide
It’s a homeowner’s nightmare: the water in the toilet bowl is rising, threatening to spill over onto your floor. Or perhaps you’ve discovered a puddle forming at the base of the toilet. In these moments of panic, one critical question flashes into your mind: how do I turn the water off, and fast? Knowing which way to turn that little valve is one of the most essential pieces of DIY knowledge. This guide will give you the quick answer right away, then walk you through a complete masterclass on your toilet’s plumbing, from handling a stuck valve to shutting off your entire home’s water supply in a true emergency.
The Quick Answer
CLOCKWISE
Why Trust This Guide?
- Master Plumber Verified: We’ve had our procedures and advice reviewed and approved by licensed master plumbers. This is the information the pros want you to have.
- Real-World Emergency Experience: This guide is written from the practical experience of having dealt with overflowing toilets, burst supply lines, and stuck valves. We know the panic and the solutions.
- Deep Understanding of Home Plumbing: We go beyond the “how” to explain the “why.” Understanding the different types of valves and how they work will make you a more confident homeowner.
- A Focus on Safety and Prevention: Our primary goal is to provide safe, clear, and actionable advice that empowers you to handle the situation correctly and prevent future issues.
Understanding Your Toilet’s Shut-off Valve (The Angle Stop)
The small valve on the wall behind your toilet is called a shut-off valve or, more technically, an “angle stop.” Its only job is to control the flow of water to your toilet, allowing you to perform repairs without shutting off water to the whole house. Knowing a few details about it can make a big difference.
The Golden Rule: “Righty-Tighty, Lefty-Loosey”
This simple mnemonic is the key. It applies to almost every screw, bottle cap, and valve you’ll encounter in the United States.
- Turning the valve handle to the **RIGHT (clockwise)** tightens the internal mechanism, closing the valve and stopping the water flow.
- Turning the valve handle to the **LEFT (counter-clockwise)** loosens the mechanism, opening the valve and allowing water to flow.
Types of Shut-off Valves
You will likely find one of two types of valves behind your toilet. Knowing which one you have can tell you a lot about its reliability.

Multi-Turn Valve (Older Style)
This valve has a round, grooved handle that you must turn several times to fully open or close. Inside, it works like a faucet, with a rubber washer that compresses against a seat to stop the water. They are common in older homes but are prone to washers wearing out and the valve seizing up from lack of use.
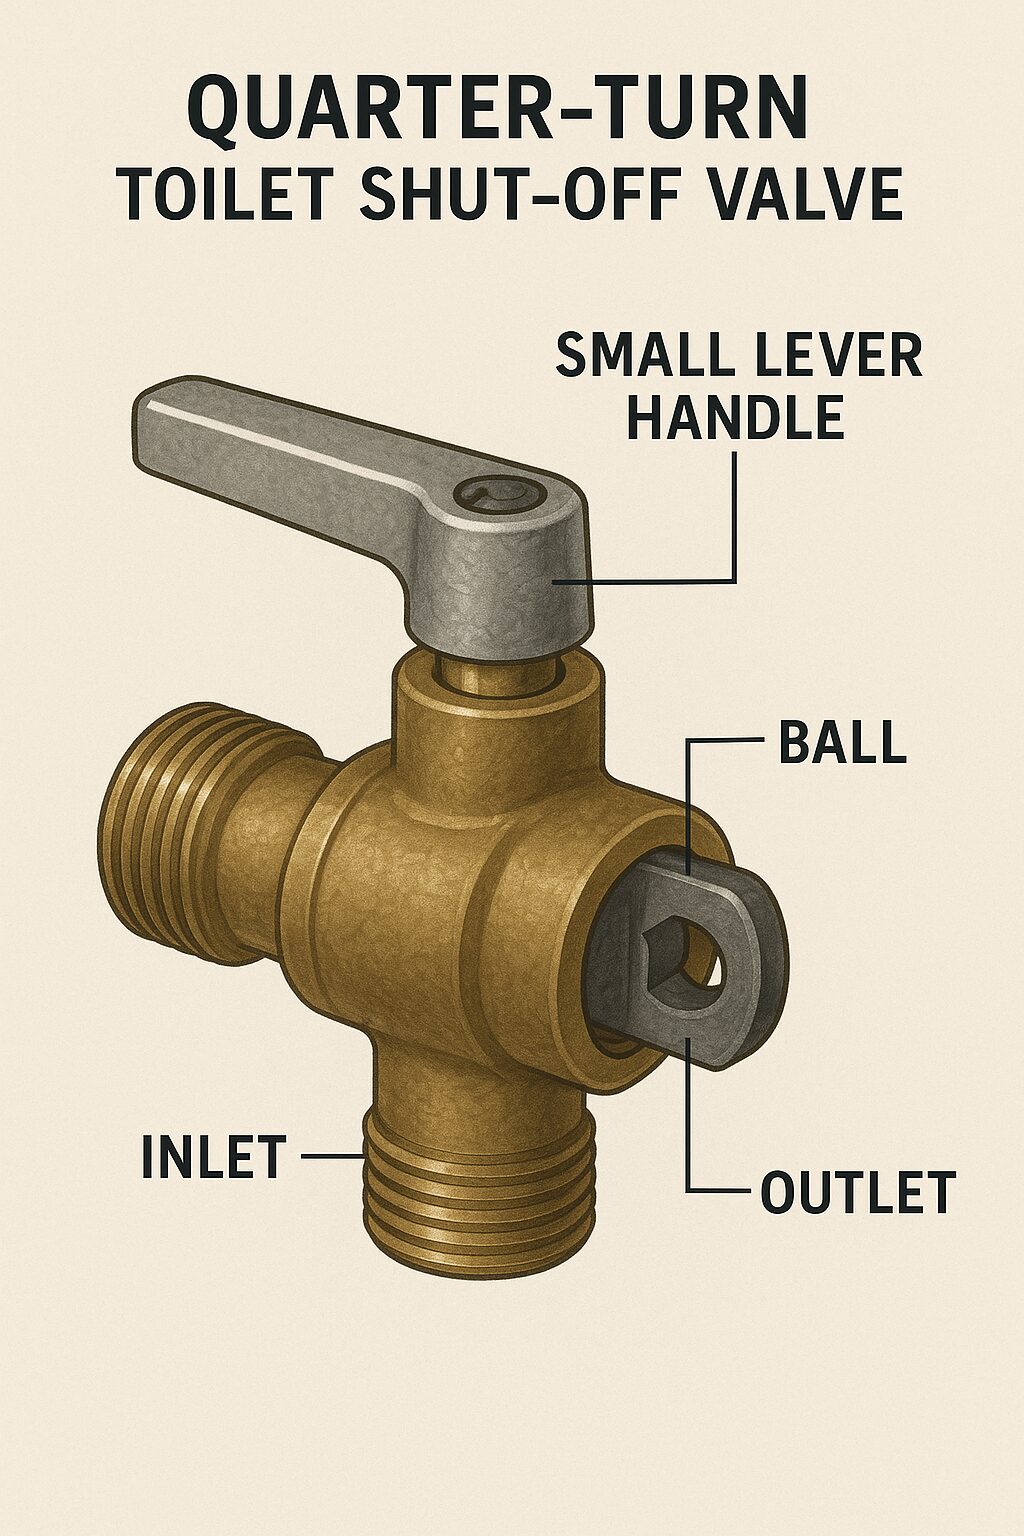
Quarter-Turn Valve (Modern Style)
This valve has a small lever handle. It only needs to be turned 90 degrees (a quarter-turn) to go from fully on to fully off. It uses a ball with a hole through it; when the lever is parallel to the pipe, water flows, and when it’s perpendicular, the flow is blocked. These are far more reliable and are the modern standard.
Upgrade Your Valve
If you have an old, multi-turn valve, the single best preventative maintenance you can do is to replace it with a modern quarter-turn ball valve. They are less likely to seize, less prone to leaking, and give you a clear visual indication of whether they are on or off. It’s an inexpensive upgrade that provides immense peace of mind.
Emergency Troubleshooting: What to Do When the Shut-off Valve Fails
You’re turning the handle clockwise, but something is wrong. Here’s how to handle the most common valve failures.
Problem #1: The Valve is Stuck and Won’t Turn
The Cause: Years of non-use combined with mineral deposits (limescale) from hard water can cause the valve to “seize” or freeze in place.
The Action Plan: Gentle Persuasion
- Improve Your Grip. Dry the valve handle and use a rag or rubber glove to get a better grip. Try turning it clockwise again with firm, steady pressure.
- Use Pliers (Gently!). If hand strength isn’t enough, grab a pair of adjustable pliers. Grip the handle firmly but do not “crank” on it with all your might. Apply slow, steady pressure. Using jerky, forceful motions can snap the valve stem, turning a small problem into a big one.
- Apply Penetrating Oil. If it’s still stuck, spray a small amount of penetrating oil like WD-40 where the handle stem enters the valve body. Let it sit for 10-15 minutes to penetrate the corrosion, then try again with the pliers.

A good pair of adjustable pliers (often called Channellocks, a popular brand name) is a must-have for any home toolkit. They provide the extra grip needed to free stuck valves and nuts, making many plumbing repairs possible.
Problem #2: The Valve Turns but the Water Doesn’t Stop
The Cause: The internal mechanism has failed. In a multi-turn valve, the rubber washer has completely disintegrated. In a quarter-turn valve, the ball or its seals are damaged.
The Action Plan: Escalate to Plan B. The valve is broken and cannot stop the water. You must now shut off the main water supply to the house.
Problem #3: The Valve is Leaking from the Handle
The Cause: The packing nut, which is the nut right behind the handle, has a small rubber seal inside it that has worn out or come loose.
The Action Plan: A Simple Tightening. Take your wrench and gently tighten the packing nut (the one closest to the handle) about one-eighth of a turn clockwise. This often compresses the internal packing seal and stops the drip. Do not over-tighten.
Plan B: How to Shut Off the Main Water Supply to Your House
Every homeowner MUST know where their main water shut-off is and how to use it. This is your ultimate failsafe in any plumbing emergency.
1. Find the Valve
The main shut-off is usually located where the main water line enters your house. Common locations include:
- In the basement, near the front foundation wall.
- In a crawl space.
- In a utility closet or near your water heater.
- In colder climates, it will always be indoors to prevent freezing. In warmer climates, it may be outside on an exterior wall or in an underground box near the street.
2. Turn It Off
You will likely have a round “gate valve” or a lever “ball valve.”
- Gate Valve (Round Handle): Turn the wheel handle clockwise all the way until it stops. It may take several full rotations.
- Ball Valve (Lever Handle): Turn the lever handle 90 degrees (a quarter-turn). The water is OFF when the handle is perpendicular (at a right angle) to the pipe.
The Permanent Fix: A Step-by-Step Guide to Replacing a Toilet Shut-off Valve
If you have a stuck, leaking, or broken valve, the best solution is to replace it. With the main water off, this is a very manageable DIY project for a confident homeowner.

Recommended Kit: Quarter-Turn Valve & Supply Line
The Complete, Reliable Upgrade
Check Price on AmazonWhen replacing your valve, always replace the flexible supply line at the same time. This kit from SharkBite includes a high-quality, easy-to-install “push-to-connect” quarter-turn valve and a durable, braided stainless steel supply line, giving you everything you need for a permanent, leak-free repair.
- Shut Off Main Water & Drain the Lines. Turn off the main water supply to the house. Then, open the faucet at the highest point (e.g., upstairs bathroom sink) and the lowest point (e.g., basement sink or outdoor spigot) of your house to drain the remaining water from the pipes.
- Disconnect the Old Valve. Place a bucket and towel under the old valve. Disconnect the toilet supply line from both the toilet tank and the valve. Then, using two wrenches—one to hold the pipe and one to turn the nut—unscrew the compression nut that holds the valve onto the copper pipe coming out of the wall.
- Clean the Pipe. Once the old valve is off, use sandpaper or an emery cloth to clean the end of the copper pipe until it is smooth and shiny.
- Install the New Valve. If using a push-to-connect valve like the one recommended, simply push it firmly onto the clean pipe until it clicks into place. If using a traditional compression valve, slide the new nut and compression ring onto the pipe, then screw the valve body onto the nut and tighten securely.
- Connect the New Supply Line. Attach the new braided supply line to the valve and the toilet tank. Hand-tighten the plastic nuts, then give them another quarter-turn with pliers.
- Turn Water Back On & Check for Leaks. Close all the faucets you opened. Go to your main shut-off and turn the water back on SLOWLY. Return to the toilet and meticulously check for any drips at all connections.
Frequently Asked Questions (FAQ)
Do I need to turn off the water to fix a running toilet?
Yes, absolutely. Any time you are working on the internal components of your toilet tank, such as the fill valve or flapper, you must turn off the water supply using the shut-off valve behind the toilet. This prevents the tank from refilling while you work and avoids a potential flood.
How often should I turn my shut-off valves?
It’s a great piece of preventative maintenance to “exercise” all the shut-off valves in your house (under sinks and behind toilets) at least once a year. Simply close them all the way and then open them again. This prevents mineral deposits from building up and causing the valve to seize.
What if my toilet has no shut-off valve at all?
In some very old homes, individual shut-off valves were not installed. This means the only way to turn off the water to the toilet is to use the main shut-off for the entire house. If this is your situation, we highly recommend hiring a plumber to install a modern quarter-turn shut-off valve. It’s a relatively inexpensive job that will make future repairs much, much easier.
Conclusion: The First Step in Any Plumbing Emergency
Knowing which way to turn your toilet’s water supply valve—clockwise to close—is a fundamental piece of homeownership knowledge. It’s the first step in stopping an emergency and the necessary prelude to almost any toilet repair. While the simple rule of “Righty-Tighty” will serve you well, understanding the different types of valves, how to handle a stuck one, and most importantly, where your main water shut-off is located, transforms you from a panicked homeowner into a prepared one.
We highly recommend you take a moment now, before there’s an emergency, to locate and test both your toilet shut-off and your main water shut-off. This simple act of preparation is the best way to ensure that when a problem does arise, you can handle it calmly and confidently.