Why Does My Toilet Keep Running? (And How to Fix It for Under $20)
That constant, faint hissing or gurgling sound coming from your bathroom is more than just an annoyance—it’s the sound of money literally going down the drain. A running toilet is one of the most common household plumbing problems, and it can waste hundreds of gallons of water per day, leading to shockingly high utility bills. The good news? You can fix over 90% of running toilet issues yourself in under an hour with a few simple tools and parts that cost less than a pizza.
Why Trust This DIY Guide?
- Hands-On Experience: This guide is written based on years of personal home maintenance experience, having fixed dozens of running toilets using these exact methods. We know what works because we’ve done it.
- Plumber-Vetted Advice: We’ve consulted with certified plumbing professionals to ensure our diagnostic steps and repair instructions are safe, accurate, and reflect industry best practices.
- Focus on Simplicity: We’ve broken down a seemingly complex problem into easy-to-follow, illustrated steps. Our goal is to empower you, the homeowner, to save money and solve the problem with confidence.
- Unbiased Product Recommendations: The parts we recommend are chosen for their reliability, ease of installation, and overwhelmingly positive reviews from thousands of other DIYers—not because of any brand sponsorship.
First, Let’s Look Under the Hood: The Anatomy of Your Toilet Tank
Before you can fix the problem, you need to understand the players. Your toilet tank is a simple but brilliant machine. Take the lid off and let’s identify the key components. Don’t worry, the water in the tank is clean!

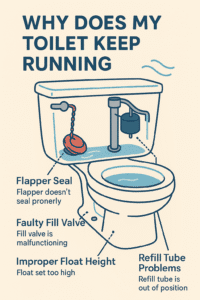
- The Fill Valve (or Ballcock): This is the tall column on the left side of the tank. Its job is to refill the tank with water after you flush. It has a float (either a ball on an arm or a cup that moves up and down the column) that tells it when to shut off once the water reaches the correct level.
- The Flapper: This rubber or plastic seal sits over the large opening at the bottom of the tank (the flush valve seat). When you press the flush handle, a chain lifts the flapper, allowing water to rush into the bowl. Its job is to create a perfect seal to hold water in the tank between flushes. This is the #1 culprit for running toilets.
- The Overflow Tube: This is the open pipe in the middle of the tank, usually part of the flush valve assembly. It’s a safety device. If the fill valve fails to shut off, excess water will drain down this tube into the bowl instead of overflowing onto your bathroom floor. A small refill tube from the fill valve is usually clipped to it to refill the bowl after a flush.
- The Flush Handle and Chain: The handle on the outside of the tank is connected to a lever on the inside. This lever is attached to a chain, which connects to the flapper. Pressing the handle lifts the lever, which pulls the chain, which lifts the flapper.
Think of it this way: The fill valve is the worker who fills the pool. The float is the supervisor who tells the worker when to stop. The flapper is the drain plug that keeps the water in the pool. If any one of them isn’t doing their job correctly, you have a problem.
Tools You’ll Likely Need
Gather these before you start. Most fixes require very few tools.
- An old towel or sponge
- Scissors or wire cutters (for trimming a new flapper chain or fill tube)
- Adjustable pliers or a wrench (optional, often not needed for modern kits)
- Rubber gloves (optional, but recommended)
The Ultimate Diagnostic Trick: The Food Coloring Test
This simple, 20-minute test is the single best way to determine if your leak is caused by a faulty flapper. It’s the first thing a professional plumber would do.
- Remove the Tank Lid. Carefully lift the lid off your toilet tank and set it somewhere safe where it won’t be knocked over.
- Add the Dye. Put a few drops of dark-colored food coloring (blue or green works best) into the tank water. Do NOT flush the toilet.
- Wait Patiently. Set a timer for 15-20 minutes and walk away. Don’t use the toilet during this time.
-
Check the Bowl. After 20 minutes, look in the toilet bowl.
- If you see colored water in the bowl, you have a confirmed leak from the tank into the bowl. The problem is almost certainly your flapper or the flush valve seat.
- If the water in the bowl is still clear, your flapper is likely doing its job. The problem is probably with your fill valve, which is allowing too much water into the tank, causing it to drain down the overflow tube.
Now that you’ve played detective, let’s hunt down the specific culprit and fix it for good.
Common Causes and Step-by-Step Fixes
We’ll start with the most common problem and work our way down the list. Chances are, your issue is one of the first two.
Problem #1: A Worn-Out, Leaky Flapper
This is the cause of a running toilet at least 80% of the time. Over years of use, the rubber on the flapper can degrade, warp, or accumulate mineral deposits, preventing it from creating a watertight seal.
How to Fix a Faulty Flapper:
- Turn Off the Water. The first step for any toilet repair is to shut off the water supply. Find the oval-shaped knob on the wall or floor behind the toilet. For a detailed guide on this, see our article on which direction to turn the toilet water off (remember: righty-tighty, lefty-loosey).
- Flush the Toilet. Press the flush handle and hold it down to drain as much water as possible from the tank. Use a sponge or towel to soak up the small amount of remaining water.
- Remove the Old Flapper. Unhook the flapper’s chain from the flush lever. Then, gently pop the flapper’s “ears” off the two pegs at the base of the overflow tube. Take the old flapper with you to the hardware store to find a match, or better yet, buy a universal replacement like our recommendation below.
- Install the New Flapper. Place the new flapper into the tank, aligning its ears with the pegs on the overflow tube and pressing them firmly into place. Connect the new chain to the flush lever.
- Adjust the Chain Length. This is a critical step! The chain should have only a very slight bit of slack when the flapper is closed—about 1/2 inch is perfect. If it’s too tight, the flapper won’t seal. If it’s too loose, it can get caught under the flapper, also preventing a seal. Trim any excess chain with scissors so it can’t interfere.
- Turn the Water Back On. Slowly turn the water supply valve back on. Let the tank fill completely. Flush the toilet a few times to ensure everything is working correctly and the running has stopped.
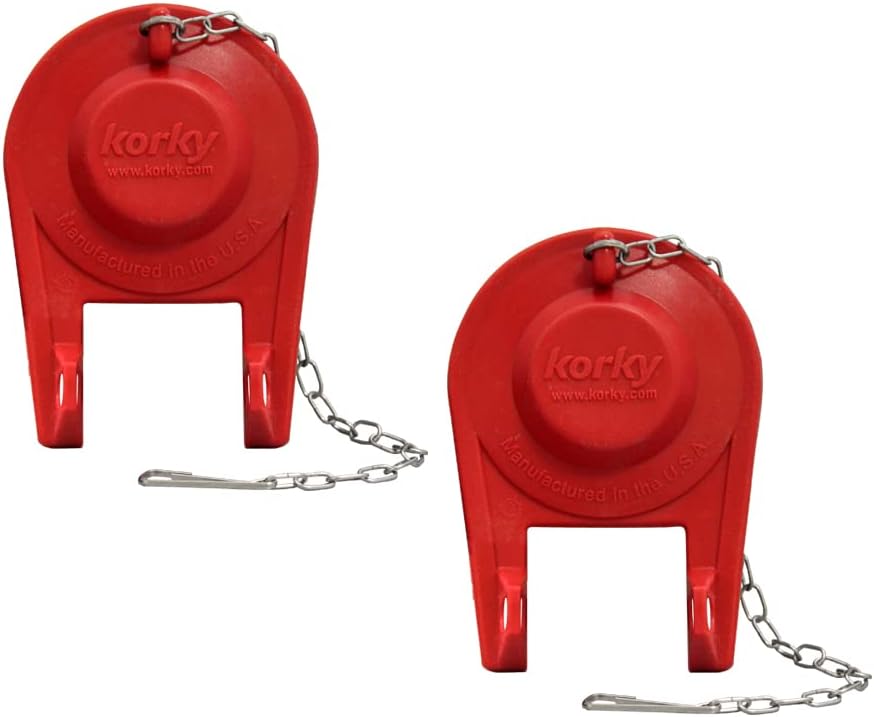
The Korky Universal Flapper is a DIYer’s best friend. It’s made from a proprietary Chlorazone rubber that resists chlorine and hard water, meaning it lasts much longer than standard flappers. Its universal design fits the majority of 2-inch flush valves found in American toilets, and the simple installation will have your toilet fixed in under 10 minutes.
Problem #2: A Faulty or Misadjusted Fill Valve
If the food coloring test was negative, the problem is likely your fill valve. Either the valve itself is failing and won’t shut off, or the float is set too high. In either case, water continuously fills the tank and drains down the overflow tube, wasting water without you ever seeing a leak in the bowl.
How to Fix a Faulty Fill Valve:
First, check the float height. For modern float-cup style valves, you can usually adjust the height by turning a plastic screw or sliding a clip. Your goal is to have the water level stop about 1 inch below the top of the overflow tube. If adjusting the float doesn’t work, or if you have an old ball-and-arm style float, it’s best to replace the entire unit. Modern kits are inexpensive, efficient, and easy to install.
- Turn Off the Water and Empty the Tank. Same as before, shut off the water supply and flush to drain the tank. Sponge out any remaining water.
- Disconnect the Supply Line. Place a towel under the tank to catch drips. Unscrew the water supply line nut from the bottom of the old fill valve (underneath the tank).
- Remove the Old Fill Valve. Unscrew the large plastic locknut that holds the fill valve to the tank. Once it’s off, you can lift the old fill valve straight out.
- Install the New Fill Valve. Insert the new fill valve into the hole in the tank. Hand-tighten the new locknut on the underside to create a snug seal. Reconnect the water supply line and hand-tighten its nut.
- Set the Height and Connect the Refill Tube. Adjust the height of the new fill valve so that its top is about 3 inches above the overflow tube. Attach the new refill tube to the valve’s nipple and clip the other end to the overflow tube.
- Turn On the Water and Fine-Tune. Turn the water on. As the tank fills, you can fine-tune the water level by adjusting the float as described in the kit’s instructions. Check for leaks around the nuts underneath the tank.

Our Recommended Fix: Fluidmaster 400A Fill Valve
The Industry Standard Replacement
Check Price on AmazonThe Fluidmaster 400A is the #1 best-selling fill valve in the world for a reason. It’s incredibly reliable, easy to install without special tools, and its universal design fits almost any toilet. It’s also adjustable, so you can easily set the perfect water level for your tank, saving water with every flush. This kit will solve most fill and hissing-noise problems permanently.
Pro Tip: The Complete Overhaul
If your toilet is more than 10 years old, consider buying a “complete repair kit” that includes both a new fill valve and a new flush valve/flapper assembly. These kits cost around $25 and will replace every moving part in your tank, essentially making it brand new. This is a great weekend project that provides total peace of mind.
When to Throw in the Towel and Call a Plumber
While most running toilet issues are easy DIY fixes, there are times when it’s best to call a professional. You should call a plumber if:
- You’ve tried replacing the flapper and fill valve, but the toilet still runs.
- You see water pooling around the base of the toilet (this could be a failing wax ring, a more complex job).
- You notice a crack anywhere on the porcelain tank or bowl.
- The bolts holding the tank to the bowl are rusted and won’t come off, or you see water leaking from them.
- You’re simply not comfortable performing the repairs yourself. A simple plumbing job is much cheaper than repairing water damage!
Frequently Asked Questions (FAQ)
How much water does a running toilet actually waste?
A lot more than you think. A moderately running toilet can waste 6,000 gallons of water per month. According to the EPA, that’s equivalent to the amount of water needed to take 200 long showers! It can easily add $50-$100 or more to your monthly water bill.
Why does my toilet run for a few seconds every hour (a “phantom flush”)?
This is the classic symptom of a slow leak from a failing flapper. The water level in the tank drops very slowly until it’s low enough to trigger the fill valve to turn on for a few seconds to top it off. The Food Coloring Test will confirm this 100% of the time. Replace the flapper to fix it.
Is it really safe to work inside my toilet tank?
Yes, absolutely. The water inside the tank comes directly from your home’s fresh water supply line; it has not yet come into contact with the waste in the bowl. It’s as clean as the water from your sink. As long as you know how to turn off the water supply, it’s a very safe and low-risk DIY project.
I heard putting a brick in the tank saves water. Is that a good idea?
This is an old, outdated, and bad idea. A real brick can crumble over time, and the debris can damage your flapper and flush mechanism. Furthermore, displacing too much water can lead to an incomplete flush, requiring you to flush a second time—which wastes more water than it saves. Modern toilets are already designed to be low-flow, and adjusting your fill valve to the proper height is a much safer and more effective way to conserve water.
Conclusion: You’ve Got This!
That persistent running sound is a problem you no longer have to live with. For the vast majority of homeowners in the U.S., a running toilet is not a sign of a plumbing catastrophe; it’s a simple mechanical failure that you have the power to fix. By following the diagnostic steps in this guide, identifying the faulty part—most likely the flapper or fill valve—and replacing it with a reliable, inexpensive part, you can solve the problem permanently.
Fixing your running toilet not only restores peace and quiet to your home but also saves a significant amount of water and money. It’s a satisfying DIY project that builds confidence and protects one of your home’s most essential fixtures. So roll up your sleeves, turn off that water valve, and get started!